In my last blog post, I wrote about setting up .Net core on an Ubuntu 16.04 machine. In this post, I will go a step forward and explain how to set up a container to run as your build agent.
Containers are brilliant in that they provide a rather lightweight mechanism of setting up desired software in your build agent without installing it on host machine or in a virtual machine. In this post, I will explain setting up a Docker container on a Windows 10 machine, install all the desired software for build agent and running a build to compile an ASP.net core application on it.
This post is split into following areas
We now install Node.js, npm and vso agent onto the image and store it as another image. To do that the first step is to run the Ubuntu:16.04 image as a container. To do that, run the following command.
The only thing left to do now is to configure the build agent. The agent installer allows us to easily create multiple agents on a single server. Each agent will run inside its own folder. We create a folder called MyBuildAgent1 and uses it to run the agent. To do this run the following commands
adduser buildagentuser
chown -R buildagentuser /MyBuildAgent1
The build agent is almost ready to run. At this stage we want to commit this container to save the image. This way we can use it again.
Step out of Docker container by pressing CTRL+P followed by CTRL+Q. You will be back to command prompt. Now type in "docker ps" to view the list of containers running. You will see a response like following

Here, the ubuntu:16.04 running container has the Id "aea7e12541d5". We will commit this container to create a new image. To do this, type in the following on your command prompt

Since, we just "stepped out" of Docker container we were working now, we will now reattach it and run the build agent. To do this type in
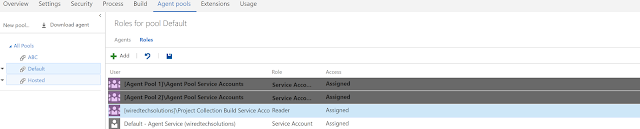
The user you specify must have the service "Service Account" role in the agent pool you specified. In my case, I had added them to the VSTS group "Agent Pool 1 Service Account Users".
.
Now that my build agent is now running, I will create now create a simple build definition to run the build. We had already created a simple .Net core Asp.net application.


This is so awesome. Now that we have the Docker image captured as well, we can start other build agents and distribute our build load across containers. This is far more efficient than running virtual machines as build agents.
Containers are brilliant in that they provide a rather lightweight mechanism of setting up desired software in your build agent without installing it on host machine or in a virtual machine. In this post, I will explain setting up a Docker container on a Windows 10 machine, install all the desired software for build agent and running a build to compile an ASP.net core application on it.
This post is split into following areas
- Setting up Docker on a Windows 10 machine
- Create a Docker image to run Build Agent.
- Configure and run a Build Agent on Docker.
- Run a Build on the newly setup Build Agent.
Set up a Docker container on a Windows 10 machine
Docker on windows uses Hyper-V to create a linux virtual machine, The Docker daemon is run on this virtual machine.This means that you need at least Windows 10 professional to run Docker. We are using Windows 10 Enterprise.
To install Docker visit the site https://docs.docker.com/docker-for-windows/ and install the .MSI by clicking the "Get Docker for Windows (stable)" button. The installation will setup Docker for you, by setting up a VM called MobyLinxuVM. It would also add Docker's bin directory to your path, so that the Docker command is available in your command window.
Every docker deployment has a "hello-world" image. To test docker, type in
docker run -it hello-world
You should see the text "Hello from Docker!" in your response.
Create a Docker image to run Build Agent
Now that docker we have a Docker instance running, lets set up a Docker image with all the software needed to run a build agent. The VSO build agent is Node.js based so installing Node.js and it's pre-requisites is a requirement. Also, since the build agent is going to build .Net Core core, we would also be installing .Net core.
To start with, we get a Docker image with the latest version of Ubuntu. At the time of writing this post, the latest version available was 16.04. So we start with getting this version. To do this run
docker run Ubuntu:16.04.It would look for the instance locally and if it's not found download it from Docker hub. Once the command is complete, the Docker Ubuntu 16.04 image will appear in your “docker images” command

We now install Node.js, npm and vso agent onto the image and store it as another image. To do that the first step is to run the Ubuntu:16.04 image as a container. To do that, run the following command.
docker run -t -i Ubuntu:16.04You will now be on command prompt of root. To run the desire software, run the following commands one after another
apt-get updateMy Ubuntu 16.04 instance didn't have https protocol installed, so installed it by running
apt-get install npm nodejs
apt-get install nodejs-legacy
npm install vsoagent-installer –g
apt-get install apt-transport--httpsWe will also need to install git on it
apt-get install git
Now, to install .Net Core run the following
sh -c 'echo "deb [arch=amd64] https://apt-mo.trafficmanager.net/repos/dotnet-release/ xenial main" > /etc/apt/sources.list.d/dotnetdev.list'
apt-key adv --keyserver apt-mo.trafficmanager.net --recv-keys 417A0893
apt-get update
apt-get install dotnet-dev-1.0.0-preview2-003131At this stage, the container contains all the software that you need to run a vso build agent.
Configure and run Build Agent
The only thing left to do now is to configure the build agent. The agent installer allows us to easily create multiple agents on a single server. Each agent will run inside its own folder. We create a folder called MyBuildAgent1 and uses it to run the agent. To do this run the following commands
mkdir MyBuildAgent1All commands so far has been run using the root user. We don't want to run the build agent to run as root, so will create a user called buildagentuser and switch to it to use it. Below are the command that you need to run.
cd MyBuildAgent1
vsoagent-installer
adduser buildagentuser
chown -R buildagentuser /MyBuildAgent1
The build agent is almost ready to run. At this stage we want to commit this container to save the image. This way we can use it again.
Step out of Docker container by pressing CTRL+P followed by CTRL+Q. You will be back to command prompt. Now type in "docker ps" to view the list of containers running. You will see a response like following

Here, the ubuntu:16.04 running container has the Id "aea7e12541d5". We will commit this container to create a new image. To do this, type in the following on your command prompt
docker commit -a "Hamid Shahid" -m "Basic vso .net core build agent" aea7e12541d5 basicvsogent:v1If you are following instructions, please use your container id. You can verify it by running "docker images". You will see the new image in the list of images

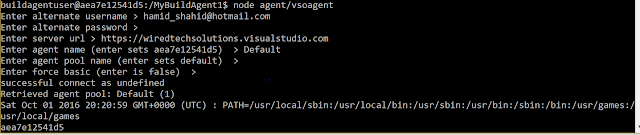
Since, we just "stepped out" of Docker container we were working now, we will now reattach it and run the build agent. To do this type in
docker attach aea7e12541d5Now start the build agent by running
node agent/vsoagentYou will be prompted about your VSTS url and the credentials to connect to. I used the following options in the prompt

The user you specify must have the service "Service Account" role in the agent pool you specified. In my case, I had added them to the VSTS group "Agent Pool 1 Service Account Users".

.
Now that my build agent is now running, I will create now create a simple build definition to run the build. We had already created a simple .Net core Asp.net application.
Run a build on the new build agent
We will now create a very simple build definition and execute it on the new agent. Our build definition has three simple steps.

1) In the first step, invoke dotnet with the argument "restore".
2) In the second, invoke dotnet with the argument "build". Make sure, you set the working folder to the source directory
3) In the third step, set the contents to "**/*.dll".
Since, we used the Default Build Pool, set it to use the default build agent. Now run the build and let's monitor the build agent command window. We should see messages regarding the statue of the build job.

This is so awesome. Now that we have the Docker image captured as well, we can start other build agents and distribute our build load across containers. This is far more efficient than running virtual machines as build agents.
The above would only work for dot net core applications. In my next post, I will write about how to set up VSTS agents on Windows Containers, where we would also have the ability to build .Net applications.
2 comments:
nice............
vietnam web hosting
google cloud server hosting
canada telus cloud hosting
algeeria hosting
angola hostig
shared hosting
bangladesh hosting
botswana hosting
central african republi
shared hosting
Borgata Hotel Casino & Spa Launches "Classics, Games & Excitement
Borgata Hotel Casino 공주 출장안마 & Spa will be the first resort on the 진주 출장샵 Atlantic 진주 출장샵 City Boardwalk to offer a luxury 포천 출장안마 hotel with all amenities like a casino 사천 출장샵
Post a Comment