In my last blog post, I wrote about steps to create a Docker container for running aspnet/Javascript Services. In the post, we created a Docker file to create a Docker image with a website running creating on VueJs and Asp.Net core.
In real life, we would like our docker images to be pushed out to a container registry. We would also like it to be done through a team build. We would also want to have a CI build in place so every commit is vetted. This blog post details setting up the CI and deployment builds for producing docker images.
We named the yaml file as .vsts-build.yml. Commit it and push it out to our git repository.
The process to set up the deployment build is same as above.
In real life, we would like our docker images to be pushed out to a container registry. We would also like it to be done through a team build. We would also want to have a CI build in place so every commit is vetted. This blog post details setting up the CI and deployment builds for producing docker images.
Dockerfile
To start with, lets review the docker file we created in the last post. I have modified it slightly to parameterized the exposed port
The docker file creates a docker image that can be pulled and deployed in any application.
We named the yaml file as .vsts-ci.yml. Commit it and push it out to our git repository.
Now that the yaml file is in our code repo, lets go and set up the CI build.
# Stage 1 - Restoring & Compiling
FROM microsoft/dotnet:2.1-sdk-alpine3.7 as builder
WORKDIR /source
RUN apk add --update nodejs nodejs-npm
COPY *.csproj .
RUN dotnet restore
COPY package.json .
RUN npm install
COPY . .
RUN dotnet publish -c Release -o /app/

# Stage 2 - Creating Image for compiled app
FROM microsoft/dotnet:2.1.1-aspnetcore-runtime-alpine3.7 as baseimage
ARG port=8080
RUN apk add --update nodejs nodejs-npm
WORKDIR /app
COPY --from=builder /app .
ENV ASPNETCORE_URLS=http://+:${port}

EXPOSE ${port}
CMD ["dotnet", "vue2spa.dll", "--server.urls", "http://+:${port}"]
Setting up the CI Build
We will use the new YAML build feature in VSTS to setup our CI/CD build. Our YAML CI build file would have a single step that would attempt to build the docker image. The publishing of website is performed within the docker build process as described in the Dockerfile above.
Our very simple YAML file looks like following
name: $(BuildDefinitionName)_$(Date:yyyyMMdd)$(Rev:.rr)
steps:
  - script: |
      docker build --build-arg port=8080 --rm --compress -t sampleaspjs/web .
    workingDirectory: $(Build.Repository.LocalPath)/web
    displayName: Build Docker Image
We named the yaml file as .vsts-ci.yml. Commit it and push it out to our git repository.
Now that the yaml file is in our code repo, lets go and set up the CI build.
- From the Build Definitions page, click on the "+ New" button to create a build definition.

- Select the source to VSTS Git, select your Team Project, repository and the default branch of master

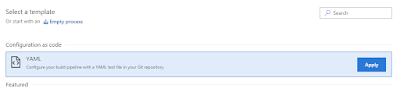
- From the list of template, select option YAML in the Configuration as Code classification and click Apply
- In the build definition, type in the build name, select the "Hosted Linux Preview" queue and select the YAML path. Make sure Continuous Integration is enabled. Save the build definition.


Now that we have the CI build, lets turn out attention to create a deployment deployment build
Setting up the product build
The steps to create our product build is similar to that of CI build except that we will have a different YAML file. Our build process will go one step further. In addition to creating the docker image, it would also push out docker images to dockerhub
Our YAML file looks like following
name: $(BuildDefinitionName)_$(Date:yyyyMMdd)$(Rev:.rr)
steps:
  - script: |
      docker build --build-arg port=8080 --rm --compress -t tiresias/web .
    workingDirectory: $(Build.Repository.LocalPath)/web
    displayName: Build Docker Image

  - script: |
        docker tag aspnetvuejs/web tiresias/web:$(Build.BuildNumber)
    workingDirectory: $(Build.Repository.LocalPath)/web
    displayName: Tag docker image with buil d version

  - script: |
        docker login --username your-username --password your-password
    workingDirectory: $(Build.Repository.LocalPath)/web
    displayName: Docker Login

  - script: |
        docker push aspnetvuejs/web
    workingDirectory: $(Build.Repository.LocalPath)/web
    displayName: Docker Push
We named the yaml file as .vsts-build.yml. Commit it and push it out to our git repository.
The process to set up the deployment build is same as above.
- From the Build Definitions page, click on the "+ New" button to create a build definition.
- Select the source to VSTS Git, select your Team Project, repository and the default branch of master
- From the list of template, select option YAML in the Configuration as Code classification and click Apply
- In the build definition, type in the build name, select the "Hosted Linux Preview" queue and select the YAML path. Make sure Continuous Integration is enabled. Save the build definition.


With the product build in place, we have a mechanism of creating docker images and pushing it out to a container registry.
Next steps
In this post, I described the steps to create a CI / build process for verifying, creating and distributing docker images. In my next post, I will deploy the docker images to a Kubernetes cluster created on Azure Kubernetes Service.
1 comment:
Share great information about your blog , Blog really helpful for us . We read your blog , share most useful information in blog . Thanks for share your blog here . Google Cloud Platform Training
Post a Comment