Introduction
My last blog post was about deploying my dockerized web application to Azure Kubernetes Service. In that post, I explained how to manually deploy docker images to a Kubernetes cluster on AKS. Though deploying manually might be a fulfilling experience, it is hardly something that we would do for an actual production system. Rather, we would want to create a deployment pipeline that automates the entire process.
In this blog post, we would create a Release using VSTS Release Management and a deployment pipeline for deploying to a Kubernetes cluster on AKS.
Creating a Release
The first step is to create a new release. From the "Build and release" menu on your VSTS project, click on the tab "Releases". Click the + button and select "Create release definition".

We are taken to the release definition page. From the template, select "Deploy to a Kubernetes Cluster".

For the names, we named our environment "dev" and gave our release the name of "DevRelease". Our deployment pipeline at this stage looks like a blank slate as shown below

Selecting Artifacts
The input to our deployment pipeline are two artifacts
1) The docker image of our web application.
This is produced by our VSTS builds and described in the post "Creating CI and Deployment builds for docker images". Our build pushed our images out to docker hub, so we will set up our pipeline to download it from there.
2) A YAML file defining our Kubernetes service.
Our YAML file looks like following and is already described in the post "Deploying your dockerized application to Azure Kubernetes Service". We saved it in a oneservice.yaml file and committed it to our source git repository.
apiVersion: v1
kind: Service
metadata:
  name: aspnetvuejs
  labels:
    app: asapnetvuejs
spec:
  type: LoadBalancer
  ports:
  - port: 80
    targetPort: 8080
    protocol: TCP
    name: port-80
  selector:
    app: aspnetvuejs
---
apiVersion: apps/v1beta1
kind: Deployment
metadata:
  name: aspnetvuejs
spec:
  replicas: 2
  template:
    metadata:
      labels:
        app: web
    spec:
      containers:
        - name: private-reg-container
          image: aspnetvuejs/web:latest
          ports:
            - containerPort: 8080
      imagePullSecrets:
        - name: docker-registry
To select the docker image artifact, click on the "+ Add" button in the Artifacts section. From the list, click option "Docker Hub".


From the list of options, select the service endpoint for your Docker Hub repository. If it's not already set up, click on the Manage button to select it. Select the Namespace and Repository and give your source an alias. Click the Add button add your artifact.
Your application is how shown in list of Artifacts.
Now, we need to add the YAML flie containing definition of our service. To do this, click the "+ Add" button in the Artifacts section again. This time, select option "Git". From the options displayed, select your team project and the Git repository. For branch, we selected branch "master" and for version selected latest for default version. Our final selection for Git looks as following
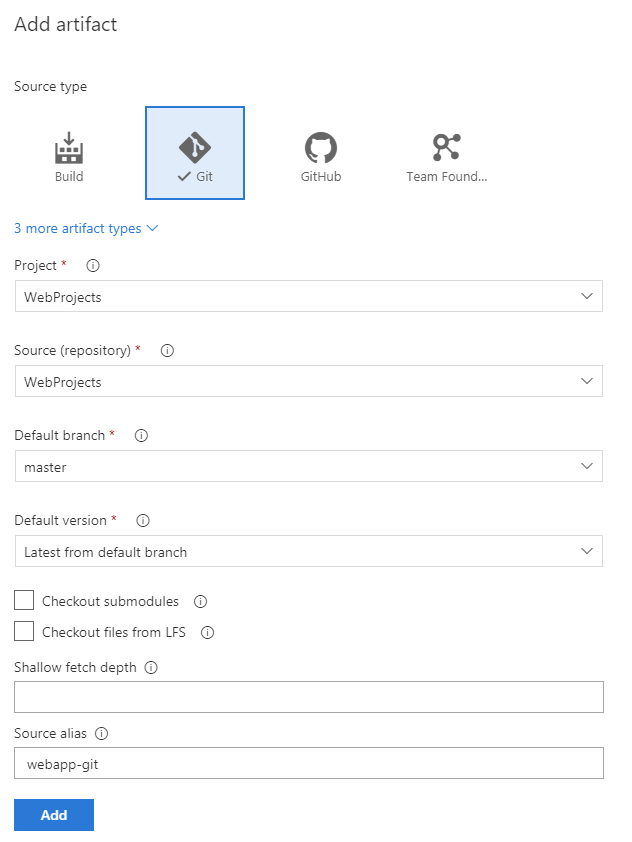
Click
on the Add button to add the artifact. Now both the input artifact to our
deployment pipeline is setup.

Setting Deployment
The next step is to configure our deployment process. Since we selected template "Deploy to a Kubernetes cluster", we already have a task setup in our deployment process as shown by the "1 phase, 1 task" link. Click on the link to view details of the deployment process. We have one task in place to run kubectl apply.

For the task arguments, we need to provide a Kubernetes Service connection. To do this, we clicked on the + New button
1) We give our connection the name "dev".
2) Set the Server URL. You can find it in the Azure portal by visiting the properties page of your Kubernetes service on Azure portal
3) To
get your KubeConfig details, type in the following on your Cloud shell session
az aks get-credentials --resource-group kubedemo --name kubedemo
Your
configurations are copied to the .kube/config file. Copy the contents of the
file and past it in your connection string.
4) Select
option "Accept Untrusted Certificate".
5) Click
on Verify Connection to verify your connection. The deployment task is now
ready to deploy to our Kubernetes cluster.

We will keep our kubectl command as apply and select the "Use configuration files" checkbox so that we can pass the YAML file from our Git repository.
For the Configuration file option, click on the ellipses button. From the Linked Artifacts, select the Git Artifact and select the YAML file we pushed out to our Git source code repository earlier. Click OK and our deployment process is ready for action.
The final and most important step is to Save our build release definition by clicking on the save button.
Running Deployment
At this stage, we have setup a build but it hasn't been deployed to an environment yet. To start a deployment, go back to the Release definitions view by clicking on Release link. Our new release is shown in the list, To deploy, we click on the ellipses with the release and click on "+ Release". A dialog appears asking about target environment and version for our artifacts. Selected the environment "dev" and the latest commit on our git repository. Click on the Create button to deploy to our Kubernetes Service.

Conclusion
This is the final post of my series of posts about creating docker images and deploy them to a Kubernetes cluster in Azure Cluster Service. In the series of posts, I explained
- How to run a simple ASPNet/JavaScript based website on docker.
- Setup a CI process by creating build definition for continuous integration and deployable builds using VSTS.
- Deploy our dockerized application as a Kubernetes Service on Azure Kubernetes Service, and finally.
- Setup a CD process by creating a release and a deployment process using VSTS.
2 comments:
It was a great information.
Docker and Kubernetes Online Training
Thanks for sharing this informative content , Great work.
rasmussen student portal
Post a Comment