Today a fellow in our project team experienced a rather strange problem while working with Team Explorer. I spent some time on it to resolve it so thought to share it out here to save someone else's precious time.
The problem we faced was that this person's team explorer was showing someone else's workspaces rather than his own.
I verified the person's credentials and his access rights on team project. Then I used TFS Sidekicks to see his workspaces and all his workspaces were still present on the server. Then I typed tf workspaces on his client machine using Visual studio command prompt and I could still see his original workspaces all right. So, why is it different when connecting from visual studio? I double checked to see if he was not executing visual studio's exe from any other account but he was not.
Finally, I checked that whether he had some saved User credentials for connection to the TFS server and ahaaa that resolves our problem! There was a saved user credential for connection to the TFS server and by default TFS explorer was using this credential rather than the credential our user was logged in as. Removed that stored credential and we got correct workspaces.
Please note that the way we are set up is that developer’s machine resides on a different domain than TFS. Each developer connects to the TFS machine by connecting to the TFS's domain using VPN, where each developer has his/her own credential. The TFS server is added in each development machine's host file. So, when connecting, Windows uses host file and stored credential information rather than the VPN user name.
Monday, 19 October 2009
Monday, 27 July 2009
Custom Output Directory for solutions in Team Build
Basically, the problem is that Team Build creates the output of compiled code in a different location than desktop build or in other words when you compile your project locally on your development machine.
I faced this issue because a new website was introduced in one of our solutions with the same name as another project in the same solution.
The only difference between the two were that they were in different directory structure. For this reason, it built fine on the local machine but once on the build server
using team build, the project compiled later overwrote all the website files of the earlier project.
Now, unlike Team Build v1, Orcas does support building using the same output structure as desktop build.
There is a Team Build property called CustomizableOutDir. If you set it to true, the output binaries are created within the same
folder structure rather than to the Binaries root directory. This post from Aaron Hallberg gives a very good account on the
new property.
I tried using that but since I only had to use it in one of my several solutions, I tried using the format
but it didn't work. Turned out the property needs to be defined in a global PropertyGroup
The above mentioned blog post mentions the use of OutDir propertiy. The OutDir property specifies the directory where Tema Build writes all output files.
Similary, there is another property TeamBuildDir is the output directory where Team Build writes the output files by default.
So, to fix the issue that all my solutions, execept for one, keep on writing to the default output directory, I wrote my buid script as follows with the CustomizableOutDir property set to true.
I faced this issue because a new website was introduced in one of our solutions with the same name as another project in the same solution.
The only difference between the two were that they were in different directory structure. For this reason, it built fine on the local machine but once on the build server
using team build, the project compiled later overwrote all the website files of the earlier project.
Now, unlike Team Build v1, Orcas does support building using the same output structure as desktop build.
There is a Team Build property called CustomizableOutDir. If you set it to true, the output binaries are created within the same
folder structure rather than to the Binaries root directory. This post from Aaron Hallberg gives a very good account on the
new property.
I tried using that but since I only had to use it in one of my several solutions, I tried using the format
<SolutionToBuild Include="$(SolutionRoot)\Development\...\Solution1.sln">
<Properties>CustomizableOutDir=true</Properties>
</SolutionToBuild>
but it didn't work. Turned out the property needs to be defined in a global PropertyGroup
<PropertyGroup>so once I have defined it all solutions would be build in place. So what to do now?
<CustomizableOutDir>true</CustomizableOutDir>
</PropertyGroup>
The above mentioned blog post mentions the use of OutDir propertiy. The OutDir property specifies the directory where Tema Build writes all output files.
Similary, there is another property TeamBuildDir is the output directory where Team Build writes the output files by default.
So, to fix the issue that all my solutions, execept for one, keep on writing to the default output directory, I wrote my buid script as follows with the CustomizableOutDir property set to true.
I hope this solution is useful for other poeple as well. If it works (or not work) for you, please do not hesitate to leave a comment.
<SolutionToBuild Include="$(SolutionRoot)\Development\...\Solution0.sln" >
<Properties>OutDir=$(TeamBuildOutDir)</Properties>
</SolutionToBuild>
<SolutionToBuild Include="$(SolutionRoot)\Development\...\Solution1.sln" >
<!-- Since this solution needs to build in place, we don't specify the OutDir property-->
</SolutionToBuild>
<SolutionToBuild Include="$(SolutionRoot)\Development\...\Solution1.sln" >
<Properties>OutDir=$(TeamBuildOutDir)</Properties>
</SolutionToBuild>
Friday, 10 July 2009
Google Chrome OS
The recent announcement made by Google that it is launching it's own operating system has created quite a media frenzy. Google Chrome as it named promises to use "Web as an OS". Not sure if I understood this marketing phrase correctly, I thought to find out exactly what is it that Google is set about doing?
After reading the details, it became quite clear to me that what google are doing is that they are "Creating a new windowing system on linux kernel". This is the only technical detail I could find of the new OS on Google blog. What constitutes an operating system is quite a debate, but I am sure purists would agree with me that "Kernel is the operating system".
So, from the details which has emerged now, Google are not creating an operating system. They are merely re-launching an existing open-source proven operating system with a new windows system (shell).
I am sure Google would make it very simple, user-friendly and easier-to-use but at the end of the day it is linux with a google shell on it. Not a new operating system as the headlines make it out to be.
PS: Some people won't agree on it and if you want you are always welcome to leave a comment and I will try to answer. My post is based on the information available today.
Wednesday, 24 June 2009
TFS Performance Report Pack
Ever since we have moved our TFS to a virtual machine on Hyper V, we have had complains about the performance of the server. The most critical part of troubleshooting performance problems is to quantify them.
For Team Foundation Server, I found "TFS Performance Report Pack", created by Grant Holiday, an invaluable resource. It is a set of reports that collect data from the TFSActivityLogging database (the database which logs all actions on TFS) and provides a visual view of the response time, number of requests and wait time for source control requests.
Until recently, the Report Pack was available only for SQL Server Reporting Services 2008. But recently Jim Saunders from TFS Developer Support Team has produced a version of it for SSRS 2005 as well.
Installation of TFS Performance Report Pack is very simple.
- Download the zip file from here and extract it to your TFS Application tier server.
- Browse to your Reporting Services, which for server TFSSERVER would be http://TFSSERVER/Reports
- Create a Data Source for the database TFSActivityLogging
- Import each report file individually.
- For each report, open the properties of the report and select the option "A shared data source". Click on the Browse button and select the data source created in step 3.
The reports are self explanatory and Grant Holliday's blog post describe them well.
Monday, 15 June 2009
TFWA
Ever since my baptism with Microsoft Team Founation Server (TFS), I have come across a number of tools, which has made working with TFS must more easier and possible for developers and configuration managers. Some of the "must have" tools for TFS are
These tools make up for many of the shortcomings in the feature list of TFS so far. Today, I come accross another tool for TFS, which I would like to add to the must haves list for TFS. The tools is called Microsoft Team System Web Access (TFWA) and is available as a free downloaded from Microsoft's website. It provides a web view of your TFS project and is pretty useful where clients cannot have Team Explorer installed on their machines.
The tool was initially developed by DevBiz and was called TeamPlain but was later acquired and made free to download by Microsoft.
The good news is that it is all integrated in TFS2010 and is not needed as a seperate download for TFS.
- Team Foundation SideKicks
- Microsoft Team Foundation Server PowerTools, and
- MSBuild Extension Pack (if you are using Team Build)
These tools make up for many of the shortcomings in the feature list of TFS so far. Today, I come accross another tool for TFS, which I would like to add to the must haves list for TFS. The tools is called Microsoft Team System Web Access (TFWA) and is available as a free downloaded from Microsoft's website. It provides a web view of your TFS project and is pretty useful where clients cannot have Team Explorer installed on their machines.
The tool was initially developed by DevBiz and was called TeamPlain but was later acquired and made free to download by Microsoft.
The good news is that it is all integrated in TFS2010 and is not needed as a seperate download for TFS.
Tuesday, 2 June 2009
Bing
I have been playing with the new Microsoft search engine - Bing and its actually not that bad. Do try it out by visiting http://www.bing.com.
Thursday, 28 May 2009
Renaming your SQL Server
If you are pondering changing the name of your development machine, you must remember to change the name of your SQL Server as well. I didn't know that and spent a good half an hour trying to run a simple query in the format
The server came back with the following error
Struck by the need to create a linked server for itself, I executed the following to find out what servers are present
Only to find that the table still contains the previous name of my machine. The resolution is pretty straight forward. Execute the following
Restart your SQL Server and bang it starts working again :)
Select <ColumnNames> from [ServerName].[DatabaseName].dbo.[TableName]
The server came back with the following error
Could not find server 'GGTFS2-0BUILD2' in sysservers. Execute sp_addlinkedserver to add the server to sysservers.
Struck by the need to create a linked server for itself, I executed the following to find out what servers are present
Select * from sys.sysservers
Only to find that the table still contains the previous name of my machine. The resolution is pretty straight forward. Execute the following
sp_dropserver '<OLD SERVER NAME>'
go
sp_addserver '<NEW SERVER NAME>', 'local'
go
Restart your SQL Server and bang it starts working again :)
Wednesday, 27 May 2009
TFS 2010 - First Encounter
I have been reading about TFS 2010 for some time now and frankly am quite eagerly waiting for it. It's a major release which promises some brilliant new features and some substantial redesign. I won’t go into details yet but Brian Harry has done a few posts about the new features in TFS 2010 Beta 1 . TFS2010 and VSTS 2010 was released last week and I had been really waiting to check them out Finally found some time to install it today. One of the areas where Microsoft has promised to bring improvements in TFS is its installation. Installation of existing versions of TFS is not simple to say the least. I remember I struggled for a couple of days while with my first installation of TFS 2005. No doubt, "TFS Best Practices Analyzer" have made troubleshooting in installation much easier installing TFS is still a complicated task.
In my opinion there are four things, which made installing TFS such a complicated task:
1) Creation of users on Active Directory. The person installing TFS needs to create a number of account TFSSETUP, TFSSERVICE and TFSREPORTS and needs to know exactly what rights need to be given to this user in each tier.
2) Dependency of TFS on Windows SharePoint Services and SQL Server Reporting Services. These should be installed and configured before TFS could be set up.
3) TFS wizard does not separate installation of components and their configuration. If there is some problem in configuring any part of installation, the whole installation has to start from scratch.
4) TFS installation wizard does not “screen” the environment for installation, something that “TFS Best Practices Analyzer” does.
I think the point (2) is also very important in that if somebody wants to NOT use detailed reports from Reporting services or the team portal but just use TFS as a source repository (like Visual Source Safe) or source and bug repository, there wasn't another way for them unless they install everything.
Microsoft has addressed at least two of these issues in TFS 2010. The new version allows TFS to be installed completely and then there are wizards for configuring each area of TFS. Also, Microsoft SQL Server Reporting Services and SharePoint are now optional for TFS 2010.
Having read about it and to see how easy it is to install the Team Foundation Server, I thought to do a bare minimum single-server deployment of TFS2010. Following are the steps that I followed to deploy TFS2010
1) Created a new virtual machine taking an image of Windows 2008 service pack 1 as baseline.
2) Installed SQL Server 2008 on the my virtual machine.
3) So our third and last major step is to install TFS 2010 beta 1 on the server. I double clicked on the TFS setup file and is shown TFS installation wizard. In a couple of minutes with a couple of clicks, TFS is installed successfully and I am presented with the following configuration wizard.
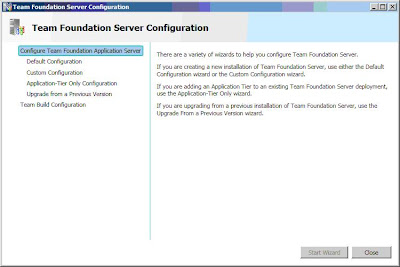 Knowing that the "Default Configuration" uses SharePoint and Reporting services, I decided to use Custom Custom configuration. So, I clicked on "Custom Configuration" and clicked "Start Wizard. The first step of Custom Configuration Wizard is shown
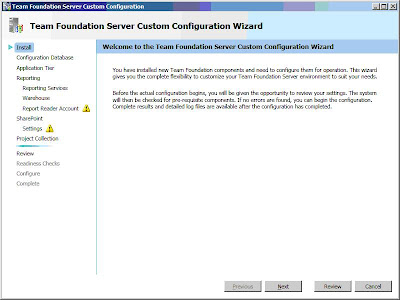 Clicked Next.
The second step "Configuration Database" asks for the name of SQL server instance and also if to use a pre-existing database.
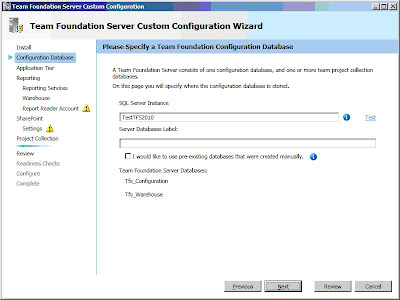
The wizard also allows to specify a label which would be included in the name of database. So if I give a label of "MYTFS" the Tfs_Configuration database would be changed to Tfs_MYTFS_Configuration
Click Next.
The next step is "Application Tier" asking about the account for TFS service and the website for TFS (whether to create a new one or to use an existing one).
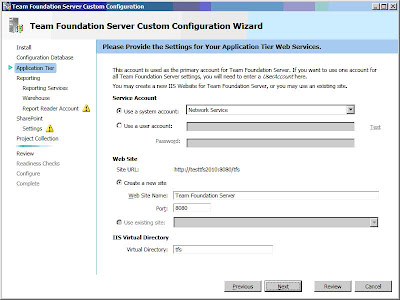
Leaving the defaults, I clicked Next
The next step goes on to configure "Reporting Services". It does tell that using reporting service is optional.
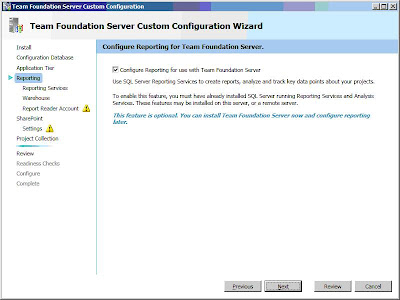 As I don't want to use Tfs Reporting so I simply unchecked the option and clicked next.
The next option is configure SharePoint.
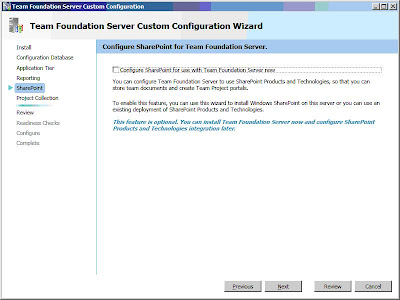 Again, it is an optional feature and I don't want to use it so I simple simply unchecked the option and clicked Next.
The next and last step asked whether I need to create a new Project Collection.
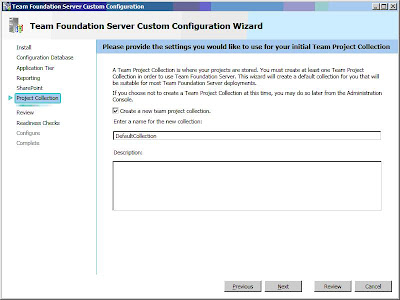
I did not want to create a new Project Collection, apart from the one created by default so just left the default options and click next.
The review screen is shown with a verify button (Something very similar to Best Practices Analyzer :))
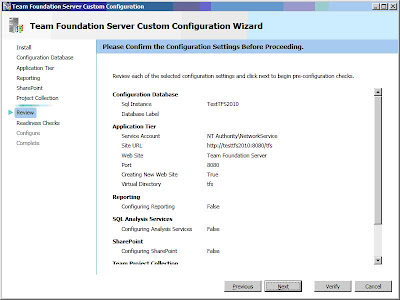
I clicked verify to see how is my installation looking and Ouch it came up with the following errors:
Not ideal but at least I know what I need to do. So, I
Now that I have installed all the pre-requisites I tried to verify again. There's a "Click to Retry" link in the bottom, which retries all the tests. Clicked it and after about 5 minutes it showed me the following success message.
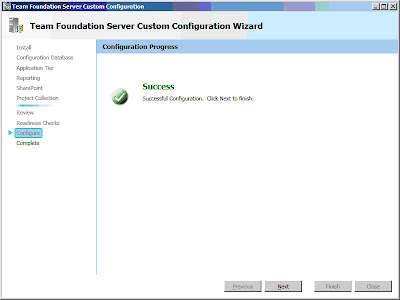
We are very close now and the whole thing is so much better than what we had in the older versions. Click Next and TFs setup is complete.
Now that TFS is all installed and configured, the next thing I wanted to do was to set up a Team Build. Team build can be on separate machines than TFS but I wanted to test it all in a single machine environment.
To configure team build, I clicked Team Build configuration from the Team Foundation Server configuration wizard and the clicked Start Wizard
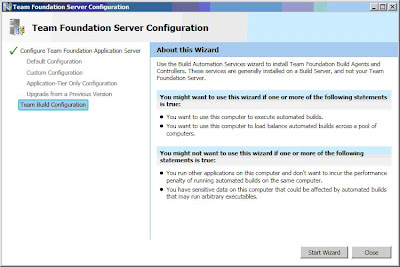
The first page of Team Foundation Build service is shown.
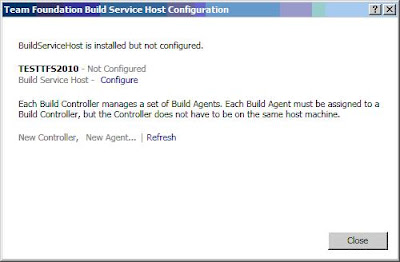
I clicked Configure and was presented with the following dialog
Since, there is no TFS server listed, I clicked on the Browse button and then clicked add.
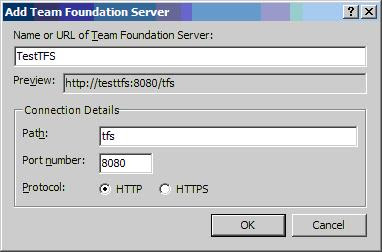
In the dialog, type in the name of my TFS server and then clicked OK.
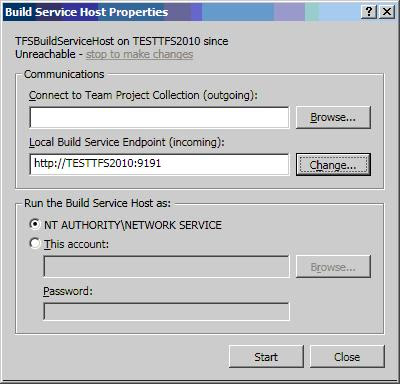
In the connect to Team Project Collection, click Connect and then click start from the Build Service Host Properties and here you go. The Build Service Host has been configured.
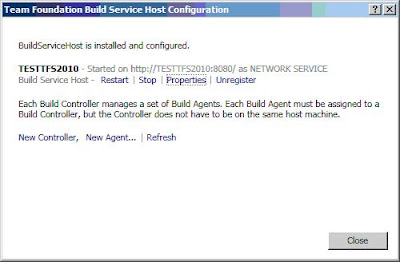
Click New Controller and it will create a new Controller service for you. The next and final step is to create a new Build Agent. Clik on New Agent. The following dialog is shown
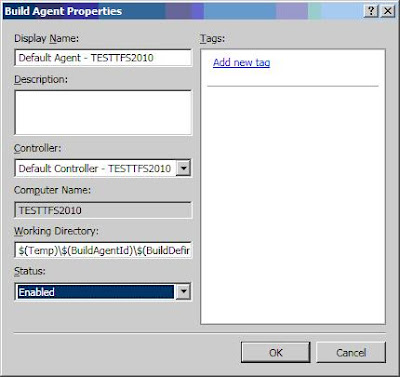
Type in a name for your agent, leave controller as default and change the status to Enabled and then click OK. And here you go, our build agent is now available for your build server.
Now, we have successfully completed a a single server installation of TFS and created a build server. If you have worked with previous version, you would appreciate how easy it is as compared to it's predecessors.
In my next post, I will create a new team project and explore new features in the new version of TFS.
In my opinion there are four things, which made installing TFS such a complicated task:
1) Creation of users on Active Directory. The person installing TFS needs to create a number of account TFSSETUP, TFSSERVICE and TFSREPORTS and needs to know exactly what rights need to be given to this user in each tier.
2) Dependency of TFS on Windows SharePoint Services and SQL Server Reporting Services. These should be installed and configured before TFS could be set up.
3) TFS wizard does not separate installation of components and their configuration. If there is some problem in configuring any part of installation, the whole installation has to start from scratch.
4) TFS installation wizard does not “screen” the environment for installation, something that “TFS Best Practices Analyzer” does.
I think the point (2) is also very important in that if somebody wants to NOT use detailed reports from Reporting services or the team portal but just use TFS as a source repository (like Visual Source Safe) or source and bug repository, there wasn't another way for them unless they install everything.
Microsoft has addressed at least two of these issues in TFS 2010. The new version allows TFS to be installed completely and then there are wizards for configuring each area of TFS. Also, Microsoft SQL Server Reporting Services and SharePoint are now optional for TFS 2010.
Having read about it and to see how easy it is to install the Team Foundation Server, I thought to do a bare minimum single-server deployment of TFS2010. Following are the steps that I followed to deploy TFS2010
1) Created a new virtual machine taking an image of Windows 2008 service pack 1 as baseline.
2) Installed SQL Server 2008 on the my virtual machine.
- From the first step in SQL Server 2008 installation, I selected "New SQL Server stand-alone installation or add features to an existing installation".
- Setup Support Rules ran and gave the following warning. I ignored it.
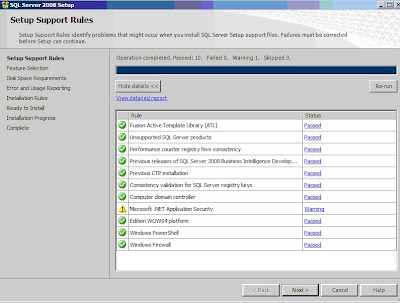
- Select following features for SQL Server 2008 installation
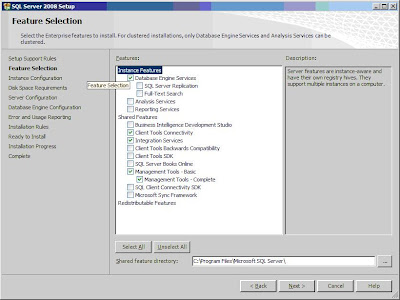
- Select default Instance
- Use NT_AUTHORITY\SYSTEM for all services
- Use Windows Authentication mode
- Use Administrator account for Database Engine configuration Account Provisioning and Analysis services configuration account provisioning.
- In the Reporting Services Configuration, select "Install the Native Mode default configuration"


3) So our third and last major step is to install TFS 2010 beta 1 on the server. I double clicked on the TFS setup file and is shown TFS installation wizard. In a couple of minutes with a couple of clicks, TFS is installed successfully and I am presented with the following configuration wizard.
 Knowing that the "Default Configuration" uses SharePoint and Reporting services, I decided to use Custom Custom configuration. So, I clicked on "Custom Configuration" and clicked "Start Wizard. The first step of Custom Configuration Wizard is shown
 Clicked Next.
The second step "Configuration Database" asks for the name of SQL server instance and also if to use a pre-existing database.

The wizard also allows to specify a label which would be included in the name of database. So if I give a label of "MYTFS" the Tfs_Configuration database would be changed to Tfs_MYTFS_Configuration
Click Next.
The next step is "Application Tier" asking about the account for TFS service and the website for TFS (whether to create a new one or to use an existing one).

Leaving the defaults, I clicked Next
The next step goes on to configure "Reporting Services". It does tell that using reporting service is optional.
 As I don't want to use Tfs Reporting so I simply unchecked the option and clicked next.
The next option is configure SharePoint.
 Again, it is an optional feature and I don't want to use it so I simple simply unchecked the option and clicked Next.
The next and last step asked whether I need to create a new Project Collection.

I did not want to create a new Project Collection, apart from the one created by default so just left the default options and click next.
The review screen is shown with a verify button (Something very similar to Best Practices Analyzer :))

I clicked verify to see how is my installation looking and Ouch it came up with the following errors:
Error [ Configuration Database ] TF255149: The following server that is running SQL Server does not have the full-text search feature installed: TestTFS2010. This feature is required for Team Foundation Server to operate correctly. Error [ Configuration Database ] TF255152: Service is not running: SQL Server Database Agent Error [ Application Tier ] TF255120: Compatibility mode for Internet Information Services (IIS) 6.0 is not enabled. Team Foundation Server requires this mode on servers that are running Windows Server 2008. Error [ Application Tier ] TFxxxxxx: The Windows Authentication role service has not been installed in the Web Server (IIS) role. This role service is required for Team Foundation Server to function properly. Error [ Application Tier ] TF255151: Service is not installed: IIS Error [ Application Tier ] TF255151: Service is not installed: IIS Admin Service Warning [ System Checks ] TF255142: Windows Firewall is not enabled. Warning [ Configuration Database ] TF255153: Service is not set to start automatically: SQL Server Database Agent
Not ideal but at least I know what I need to do. So, I
- Started SQL Server Agent Service.
- Changed Start Mode of SQL Server Agent service from Manual to Automatic.
- Added Full-Text search feature to the existing installation of SQL Server 2008.
- From Administrative tools, select "Server Manager". Then from the "Roles", click "Add Role". Added following Roles to the server
- Web Server (IIS) : Adding web server showed the following dialog that I cannot add Web server unless Windows Process Activation Service is installed
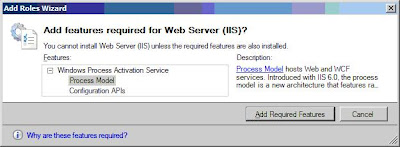
- Clicked Add Required Features and the dialog closes.
- I installed the following services to the web server role
- Common HTTP Features
- HTTP Logging
- Requrest Monitor
- Windows Authentication
- Request Filtering
- Static Content Compression
- IIS Management scripts and tools
- IIS6 Management Compatibility
- Clicked Next and it starts installing the Web Server role

Now that I have installed all the pre-requisites I tried to verify again. There's a "Click to Retry" link in the bottom, which retries all the tests. Clicked it and after about 5 minutes it showed me the following success message.

We are very close now and the whole thing is so much better than what we had in the older versions. Click Next and TFs setup is complete.
Now that TFS is all installed and configured, the next thing I wanted to do was to set up a Team Build. Team build can be on separate machines than TFS but I wanted to test it all in a single machine environment.
To configure team build, I clicked Team Build configuration from the Team Foundation Server configuration wizard and the clicked Start Wizard

The first page of Team Foundation Build service is shown.

I clicked Configure and was presented with the following dialog

Since, there is no TFS server listed, I clicked on the Browse button and then clicked add.

In the dialog, type in the name of my TFS server and then clicked OK.
In the connect to Team Project Collection, click Connect and then click start from the Build Service Host Properties and here you go. The Build Service Host has been configured.

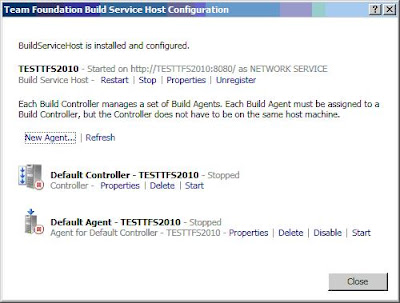
Click New Controller and it will create a new Controller service for you. The next and final step is to create a new Build Agent. Clik on New Agent. The following dialog is shown

Type in a name for your agent, leave controller as default and change the status to Enabled and then click OK. And here you go, our build agent is now available for your build server.

Now, we have successfully completed a a single server installation of TFS and created a build server. If you have worked with previous version, you would appreciate how easy it is as compared to it's predecessors.
In my next post, I will create a new team project and explore new features in the new version of TFS.
Wednesday, 20 May 2009
Microsoft C# 4.0
Today, I had a chance to look at this excellent presentation from Anders Hejlsberg on Microsoft C# 4.0 and it's future direction. Found it really enlightening. What I also find fascinating is that C# is evolving into more and more dynamic language, where type correction is making way for flexibility and powerful expression. We saw some of that with the introduction of var keyword in C# 3.0 and now we have a new keyword "dynamic" for Dynamic Language Runtime. I can almost hear a Visual Basic vs C++ argument echoing into my ears :) Language purists might loathe it but we can't deny the advantages of dynamic languages in creating quick simple applications. (Imagine the life if javascript was strongly typed). The danger is ofcourse that people would get carried away with it and we would see quite a lot of badly written dynamic code causing lots and lots of runtime type conversions.
Another notable thing is the use of more and more functional programming features in C#. This is definitely a good thing. Especially now that all modern languages run over a virtual machine, where they have a real chance to get some performance optimisation by doing some clever prediction on the behaviour of executing code.
PS: Beta 1 of VSTS2010 and .Net 4.0 was released today for MSDN subscribers. Here's the link
Sunday, 17 May 2009
Wolfram Alpha
After all the hype, Wolfram Aplha was launched this weekend and has already attracted tremendous media coverage. It's been touted as the future face of internet. Unlike traditional search engines, it claims to be an "answer engine" rather than a search engine. You type in the question and it come up with an answer ... nice.. isn't it. Sounds like the "Computer" in science fiction movies.
Unlike google, it's not a search engine. It's a "knowledge engine" containing trillions of data elements stored in a manner that computation is possible on them. Mathemetica, also developed by Steven Wolframe is at the heart of the engine. I did some queries on the engine like "What is the population of the world" and "center of the earth" and it came up with the numbers - very impressive
Then I remember that is a "I'm feeling lucky" button on google, which also make an "intelligent guess" on your answer. I typed in the same questions "What is the population of the world" and "center of the earth" and google took to wikipedia page about the population of world - not exactly what I asked for. Wolfram Alpha scored over google.
But then I asked a non-factual question "Who is Roger federer's wife" and wolfram alpha was stumped. Asked the same on google and it promptly came up with the page of his wife's details.
I tried another question "best place to eat in London" and wolfram alpha didn't return an answer. Asked the same to google and pressed the "I'm feeling lucky" button it came up with a list of restaurants - not exactly and answer but let me choose from a list of good restaurants. This is exactly what I wanted.
The matter of fact is that it is almost impossible to find answers of absolute everything. A lot of things have answers, which depend upon the context in which the question is asked. The question "Best restaurant in London" would have a different answer depending upon the person's own likes or dislikes. So until an engine like Wolfram Alpha has a historical perspective of every visiting person (which itself is a scary thought), it is very difficult to complete what the ultimate vision of the project is.
Also, the hype that Wolfram Alpha will replace google is not true as said by the creater himself.
Friday, 15 May 2009
Reconfiguring Build agents after moving TFS machine - Revisited
In my last post, I wrote about how to re-configure your build agents after you have moved your TFS server from one machine to another. Well, it worked for most of our build agents but for one. The server didn't have any entry for the the registry key
HKCU\Software\Microsoft\VisualStudio\9.0\TeamFoundation\Build\Service\AllowedTeamServer
and in <add key="AllowedTeamServer" value="" /> setting in the tfsbuildservice.exe.config file. I tried to change the value in the config file to the new server and from everywhere I could find in registry but nothing worked.
I found that TFS also maintain settings in the registry entry
HKEY_USERS\S-1-5-21-3665379455-301544577-1723053213-1110\Software\Microsoft\VisualStudio\9.0\TeamFoundation\
where, S-1-5-21-3665379455-301544577-1723053213-1110 is the ID of the user under whose context the Team Foundation Server Build service is running.
I added keys for Build\Service and a string value for setting "AllowedTeamServer" - giving the name of the new TFS server in the setting value. Restarted the server and the build agent started working.
Wednesday, 13 May 2009
Reconfiguring Build agents after moving TFS machine.
In my previous post, I wrote about moving Team Foundation server from one machine to another (I moved it from a physical machine to a virtual machine). The move went very smooth and is well documented.
However, making the build agents to work with new TFS was a different story. As part of sanity test after the move, I checked out a few files, checked them back in, browsed through the history, added and updated some work items and everything went hunky dory. But when I tried to run the build, I got the following error:
TF215085: An error occured while connecting to agent \TeamProjectName\AgentName: The build (vstfs:////Build/Build/14918) has already completed and cannot be started again.
Searching the error number on the internet mostly suggested that the user for the build service does not have access rights to access TFS server. It proved to be red herring.
After confirming that the user had all the rights it needed on the build server, the second thing was to verify whether the TFS machine can reach the build server. There is a setting in the tfsbuildservice.exe.config, which tells what servers are allowed to access this build server.
It is empty by default and so was the case with me. The build service keeps the name of the TFS Server at registry entry
HKCU\Software\Microsoft\VisualStudio\9.0\TeamFoundation\Build\Service\AllowedTeamServer
I looked in there and could see that it had the name of my previous TFS service. I changed that. Search the whole registry and replaced all entries of previous TFS server with the new one. Restarted the buld server but it still didn't work.
Then, I put the value of new TFS server in the config file and restarted the service and Wholla it built correctly. Once the build happened, I configured the config file back to it's default state, restarted the service and it still builds correctly.
Monday, 11 May 2009
MSBuild Extensions
Today, I noticed that my first ever contribution to an open source project has been published. I had been working closely with Mike Fourie, who has been heavily involved with the MSBuild Extension pack. It's a library with a number of tasks that you can use in your MSBuild project, so that you don't have to re-invent the wheel. The tasks include commonly used functionality like managing folders, giving access rights to users, managing COM Plus applications, etc.
I use this library a lot in our project. I recently wrote some new functionality to concatenate strings in an MSBUIlD string. This got published in early April and Mike has kindly mentioned my name there :) http://msbuildextensionpack.codeplex.com/SourceControl/ListDownloadableCommits.aspx?ViewAll=true
More, I have also written functionality to create shortcut of installed files, so users can create links in desktop, start menu etc. It's not published as well.
Thursday, 7 May 2009
Moving Team Foundation Server from Physical to a virtual machine
We have been using a single-machine installation of TFS for quite a few years now. The single-machine installation with Application & Data tiers on a single server serves us well. We recently moved from TFS 2005 to TFS 2008 but remained on SQL Server 2005. A recent review of the project identified potential benefits of moving TFS to a virtual machine. Microsoft’s stance on this is that the application tier of TFS is supported in Hyper V but SQL Server 2005 is not. However, browsing through various posts and example scenarios we decided to go for it.
Microsoft has provided a complete guide of moving from one hardware configuration to another, which is fairly comprehensive. Here I will write only from the perspective of moving a single server.
Note that in our scenario, we are also moving the domain of our TFS server. Some of these steps are not needed if your new TFS server uses the same server. Also, I assume that you have already had TFS installed in your new server. To install the TFS server you can download TFS installation guide from here If you have MSDN subscription, you can avoid the pain of installing everything by simply downloading TFS VM
Existing TFS Machine:
- Take a backup of Encryption key from your Reporting Server.
a. For this, open Start menu >> Microsoft SQL Server 2005 >> Configuration Tools >> Reporting Service Configuration.
b. Ensure that the Machine & Instance Names are correct and click Connect.
c. Click Encryption Keys from left menu and click on the Backup button.
d. Save the key file to a location from where you can read it in the new server. - Take a backup of existing TFS databases and copy them out. I use LiteSpeed from Quest Software to take backups but simple SQL scripts or a manual backup of all databases would do the same. The databases that you need to take backup of are
- ReportServer
- ReportServerTempDB
- TfsBuild
- TfsIntegration
- TfsVersionControl
- TfsWarehouse
- TfsWorkItemTracking
- TfsWorkItemTrackingAttachments
Make sure that you copy the backup files & encryption keys to a place from where they can be read by the new server.
New TFS Machine:
Preparation:
1. Copy the backed up databases to local drive.
2. From a Command Prompt window, run
- net stop TFSServerScheduler
- net stop SPTimer
3. In Internet Information Services (IIS) Manager, stop the following app pools
- ReportServer
- TFS AppPool
4. Stop the Reporting Service instance. To do this
- For this, open Start menu >> Microsoft SQL Server 2005 >> Configuration Tools >> Reporting Service Configuration.
- Ensure that the Machine & Instance Names are correct and click Connect.
- Click Server Status from left menu and click on the stop button.
Database Restoration:
Connect to SQL server using SQL Server Management Studio and restore the following database in the same order:
• ReportServer
• ReportServerTempDB
• TfsBuild
• TfsIntegration
• TfsVersionControl
• TfsWarehouse
• TfsWorkItemTracking
• TfsWorkItemTrackingAttachments
Setting Database users:
Since the database restored are from a different machine, with a different domain, the database users need to be set up again.
1. Click Start, click All Programs, Microsoft SQL Server 2005, and then click SQL Server Management Studio.
2. In the Connect to server dialog, click OK.
3. Expand Databases.
4. Expand the database “TfsActivityLogging”. Expand Security and then expand Schema. Name the new Schema as
5. Expand the TfsBuild database. Expand Security and then expand Schema. Name the new Schema as
6. Expand the TfsIntegration database. Expand Security and then expand Schema. Name the new Schema as
7. Expand the TfsVersionControl database. Expand Security and then expand Schema. Name the new Schema as
8. Expand the TfsWarehouse database. Expand Security and then expand Schema. Name the new Schema as
9. Expand the TfsWorkItemTracking database. Expand Security and then expand Schema. Name the new Schema as
10. Expand the TfsWorkItemTrackingAttachments database, Expand Security and then expand Schema. Name the new Schema as
Change Server Name in Tables
Now, since the databases we have restored contains details of the old database. We need to change the name of servers from within the database. I did it by manually changing the serverName in database tables
1. Open table tbl_database in database “TfsIntegration”. Replace the value of column “servername” with the name of new TFS server.
Reconfigure Application Tier
1. From a Command Prompt window, run
C:\Program Files\Microsoft Visual Studio 2008 Team Foundation
Server\Tools\TfsAdminUtil ActivateAT
Reconfigure Report Server
To restore and verify Report Server on the new Team Foundation Server
1. Click Start, click Administrative Tools, and then click Internet Information Services (IIS) Manager.
2. In the Explorer pane, under the Application Pools node, right-click Report Server, and then click Start.
3. Click Start, click Programs, click Microsoft SQL Server 2005, click Configuration Tools, and then click Reporting Services Configuration.
4. In Report Server Installation Instance Selection, make sure that the computer name is the name of the new Team Foundation application-tier server and that the instance name is MSSQLSERVER, and then click Connect.
5. In the Explorer pane, click Server Status.
6. In the Report Server Status pane, in Instance Properties, click Start.
7. In the Explorer pane, click Database Setup.
8. In the Database Connection pane, make sure that the name of the Team Foundation data-tier server is correct in Server Name, and then click Connect.
9. On the SQL Server Connection Dialog dialog box, click OK.
10. In the Database Connection pane, click Apply.
11. On the SQL Server Connection Dialog dialog box, click OK.
12. Restore the encryption key and remove previous instances of Report Server by doing one of the following:
If you are running SQL Report Server Enterprise Edition
1. In the Explorer pane of Reporting Services Configuration, click Encryption Keys.
2. In the Explorer pane, click Encryptions Keys.
3. On the Encryption Key page, click Restore.
4. On the Encryption Key Information page, type the password for the encryption key file in Password, type or select the backup encryption key .snk file location in Key File, and then
click OK.
5. In the Explorer pane of Reporting Services Configuration, click Initialization.
6. On the Initialization page, select the instance ID that corresponds with the name of the old Team Foundation data-tier server, click Remove, and then click OK.
Note: Do not remove the installation ID that you recorded in the "To save Reporting Service installation IDs and stop services" section of this document.
13. Open Internet Explorer and connect to http://localhost/reports [ http://localhost/reports ] . In Contents, click TfsReportDS.
14. In Connection string, type “Data source=TFSMachineName;initial catalog=TfsWarehouse”. Select option Credentials stored securely in the report. Update the user name and password to reflect the new reporting services service account. Check the checkbox “Use as Windows credentials when connecting to the data source” and then click Apply.
15. Under SQL Server Reporting Services, click Home.
16. In Contents, click TfsOlapReportsDS.
17. In Connection string, type “Data source=TFSMachineName;initial catalog=TfsWarehouse”. Select option Credentials stored securely in the report. Update the user name and password to reflect the new reporting services service account. Check the checkbox “Use as Windows credentials when connecting to the data source” and then click Apply.
18. Click Start, click Administrative Tools, and then click Internet Information Services (IIS) Manager.
19. In the Explorer pane, under the Application Pools node, right-click Team Foundation Server, and then click Start.
20. Open a Command Prompt window and change directories to drive:\%ProgramFiles%\ Microsoft Visual Studio 2008 Team Foundation Server\Tools. Type the following command, where newDataTierServerName is the name of your new Team Foundation data-tier server, TFSReportServiceAccount is the name of the reporting services service account, and TFSServiceAccount is the name of the Team Foundation Server service account:
SetupWarehouse.exe -o -s newDataTierServerName -d Tfswarehouse -c warehouseschema.xml -ra TFSReportServiceAccount -a TFSServiceAccount –mturl http://TFSServerName:8080
21. On the Team Foundation data-tier server, click Start, click Programs, click Microsoft SQL Server 2005, and then click SQL Server Management Studio.
22. On the Connect to Server dialog box, in Server type, select Database Engine, verify that the server name and authentication values are correct, and then click Connect.
23. In the Object Explorer pane, expand Databases, expand TFSWarehouse, expand tables, right-click dbo._WarehouseConfig, and then click Properties.
24. In Table Properties - _WarehouseConfig, in Select a page, click Permissions.
25. In Users or Roles, click Add.
26. In Select Users or Roles, add the Reporting Services service account (referred to generically as TFSReports), and then click OK.
27. In Table Properties - _WarehouseConfig, click OK.
28. In the Object Explorer pane, click Connect, and select Analysis Services.
29. On the Connect to Server dialog box, make sure that the server name and authentication values are correct, and then click Connect.
30. In the Object Explorer pane, expand Databases, right-click TFSWarehouse, and then click Process.
31. In Process Database - TFSWarehouse, click OK.
Reset Domain Accounts and SID
Please note that these steps are only needed if the domain of the new server is different to the original server
1. From a Command Prompt window
- Execute C:\Program Files\Microsoft Visual Studio 2008 Team Foundation Server\Tools\TfsAdminUtil Sid.
- Create users in the domain for all accounts that are listed as a result of last command.
- Execute C:\Program Files\Microsoft Visual Studio 2008 Team Foundation Server\Tools\TfsAdminUtil Sid /Change
2. Add user
Restart Services and verification
1. On the Team Foundation application-tier server, change directories to http://localhost/reports.
2. In Contents, click any project, click any one of the default reports in the project, and then verify that it appears correctly.
3. On the new Team Foundation application-tier server, click Start, click Administrative Tools, and then click Internet Information Services (IIS) Manager.
4. In the Explorer pane, expand the Application Pools node, right-click TFS App Pool, and then click Start.
5. On the new Team Foundation application-tier server, click Start, click Administrative Tools, click Services, select the TFSServerScheduler service, and then click Start, if it is not started already. Select the SharePoint Timer Service, and then click Start.
6. On the Team Foundation data-tier server, connect to http://localhost:8080/WorkItemTracking/v1.0/ClientService.asmx.
7. In ClientService, click StampWorkitemCache.
8. In StampWorkitemCache, click Invoke.
Note: The StampWorkitemCache invocation will not return any data.
I hope this post will help you move single-server TFS installation around quickly and easily. If you find any error in any of these steps, please do leave a comment.
Tuesday, 31 March 2009
Now and then...
Today, I read this brilliant post from Jawwad Farid and it immediately struck a chord with me.
From my early childhood memories, I remember that things around us were not in such abundance and people generally lived a much simpler life. I remember, we did not have a telephone at home. Having a phone was a privelege. Infact our whole apartment block had just two households with phone. All acquainances just called our neighbours, who would call us attend the call. Try telling it to today's kids in school. They would genuinely struggle with the idea of sharing their cell phones with their siblings. And it wasn't just technical items. All other things like cars, long distance travel, fast food, etc. were scarce and a luxury.
Most the people I know from my childhood have progressed in some form or another. People who came to Karachi from small village and towns in search of better lives have settled down, some have bought property in their ancestral lands. People with motorbikes now have cars - sometimes two. And all of this is from Pakistan, at times when the country have moved from one sort of crisis to another .
So, the question is where has all this money come from? No doubt, technical progress has contributed a lot. Things got cheaper and more accessible. Also, people worked hard and. But, for me one of the greatest reason is the world's definite tilt towards capitalism. In the last two decades, we have seen the world moving from nationalisation and a more state controlled "population focussed" model to a privatised and "profit centric" model. There has been many winners of this model but also the disparity of wealth between wealthy & poor has swelled tremendously. People have more wealth but at the same time they have become more indebted as well.
The current economic meltdown may just prove to be a turning point. We have already seen huge enterprises being bailed out and effectively getting "nationalised", so a lot of things that happened in the last two decardes in being undone. Let's see how far it goes and what the future unfold for all of us.
Friday, 20 March 2009
Adding Permissions to a shared folder using WMI and Microsoft .Net
A couple of days ago, I was looking at giving rights to domain users on an already existing shared folder. I searched for it on the net and didn’t find any comprehensive example of how to do it, so thought to put it here to help any desperately lazy developers out there
I am going to assign “Full Control” to a user called “MyDomain\MyUser” on a shared folder called “Shared”. To do this I am using WMI through the .Net System. Management library. WMI is not very intuitive, but once you get hold of it, it’s really powerful to work with all those network objects.
To assign permission to the user, the following needs to be done
The above mentioned steps might seem a lot but once you know which WMI objects to use and how they are related to each other, the actual source code is not difficult.
The following function assigns user to the given shared folder.
The code above is pretty self explanatory, albeit not a good demonstration of catching exceptions and checking for boundary conditions.
As you can see, I am using the ManagementObjectSearcher class to search for shared folder’s setting and user account objects as done in the GetSharedFolderObject() and GetUserAccountObject() methods. Once, we have got the objects, we are working with them to modify and create the related objects necessary to give new permissions.
I am going to assign “Full Control” to a user called “MyDomain\MyUser” on a shared folder called “Shared”. To do this I am using WMI through the .Net System. Management library. WMI is not very intuitive, but once you get hold of it, it’s really powerful to work with all those network objects.
To assign permission to the user, the following needs to be done
- Get hold of the Shared folder object’s setting and extract its security descriptor.
- Extract Access Control List (ACL) from the security descriptor.
- Get hold of the user account object and extract its security descriptor.
- Create a Windows Trustee object for the user using its security descriptor.
- Create an Access Control Entry (ACE) using the Trustee object.
- Add Access Control Entry to Access Control List.
- Assign List back to Security Descriptor for the folder
- Reassign security descriptor to the shared folder.
The above mentioned steps might seem a lot but once you know which WMI objects to use and how they are related to each other, the actual source code is not difficult.
The following function assigns user to the given shared folder.
/// <summary>
/// Creates the share.
/// </summary>
public void AddPermissions(string sharedFolderName, string domain, string userName)
{
// Step 1 - Getting the user Account Object
ManagementObject sharedFolder = GetSharedFolderObject(sharedFolderName);
if (sharedFolder==null)
{
System.Diagnostics.Trace.WriteLine("The shared folder with given name does not exist");
return;
}
ManagementBaseObject securityDescriptorObject = sharedFolder.InvokeMethod("GetSecurityDescriptor", null, null);
if (securityDescriptorObject == null)
{
System.Diagnostics.Trace.WriteLine(string.Format(CultureInfo.InvariantCulture, "Error extracting security descriptor of the shared path {0}.", sharedFolderName));
return;
}
int returnCode = Convert.ToInt32(securityDescriptorObject.Properties["ReturnValue"].Value);
if (returnCode != 0)
{
System.Diagnostics.Trace.WriteLine(string.Format(CultureInfo.InvariantCulture, "Error extracting security descriptor of the shared path {0}. Error Code{1}.", sharedFolderName, returnCode.ToString()));
return;
}
ManagementBaseObject securityDescriptor = securityDescriptorObject.Properties["Descriptor"].Value as ManagementBaseObject;
// Step 2 -- Extract Access Control List from the security descriptor
int existingAcessControlEntriesCount = 0;
ManagementBaseObject[] accessControlList = securityDescriptor.Properties["DACL"].Value as ManagementBaseObject[];
if (accessControlList == null)
{
// If there aren't any entries in access control list or the list is empty - create one
accessControlList = new ManagementBaseObject[1];
}
else
{
// Otherwise, resize the list to allow for all new users.
existingAcessControlEntriesCount = accessControlList.Length;
Array.Resize(ref accessControlList, accessControlList.Length + 1);
}
// Step 3 - Getting the user Account Object
ManagementObject userAccountObject = GetUserAccountObject(domain, userName);
ManagementObject securityIdentfierObject = new ManagementObject(string.Format("Win32_SID.SID='{0}'", (string)userAccountObject.Properties["SID"].Value));
securityIdentfierObject.Get();
// Step 4 - Create Trustee Object
ManagementObject trusteeObject = CreateTrustee(domain, userName, securityIdentfierObject);
// Step 5 - Create Access Control Entry
ManagementObject accessControlEntry = CreateAccessControlEntry(trusteeObject, false);
// Step 6 - Add Access Control Entry to the Access Control List
accessControlList[existingAcessControlEntriesCount] = accessControlEntry;
// Step 7 - Assign access Control list to security desciptor
securityDescriptor.Properties["DACL"].Value = accessControlList;
// Step 8 - Assign access Control list to security desciptor
ManagementBaseObject parameterForSetSecurityDescriptor = sharedFolder.GetMethodParameters("SetSecurityDescriptor");
parameterForSetSecurityDescriptor["Descriptor"] = securityDescriptor;
sharedFolder.InvokeMethod("SetSecurityDescriptor", parameterForSetSecurityDescriptor, null);
}
/// <summary>
/// The method returns ManagementObject object for the shared folder with given name
/// </summary>
/// <param name="sharedFolderName">string containing name of shared folder</param>
/// <returns>Object of type ManagementObject for the shared folder.</returns>
private static ManagementObject GetSharedFolderObject(string sharedFolderName)
{
ManagementObject sharedFolderObject = null;
//Creating a searcher object to search
ManagementObjectSearcher searcher = new ManagementObjectSearcher("Select * from Win32_LogicalShareSecuritySetting where Name = '" + sharedFolderName + "'");
ManagementObjectCollection resultOfSearch = searcher.Get();
if (resultOfSearch.Count > 0)
{
//The search might return a number of objects with same shared name. I assume there is just going to be one
foreach (ManagementObject sharedFolder in resultOfSearch)
{
sharedFolderObject = sharedFolder;
break;
}
}
return sharedFolderObject;
}
/// <summary>
/// The method returns ManagementObject object for the user folder with given name
/// </summary>
/// <param name="domain">string containing domain name of user </param>
/// <param name="alias">string containing the user's network name </param>
/// <returns>Object of type ManagementObject for the user folder.</returns>
private static ManagementObject GetUserAccountObject(string domain, string alias)
{
ManagementObject userAccountObject = null;
ManagementObjectSearcher searcher = new ManagementObjectSearcher(string.Format("select * from Win32_Account where Name = '{0}' and Domain='{1}'", alias, domain));
ManagementObjectCollection resultOfSearch = searcher.Get();
if (resultOfSearch.Count > 0)
{
foreach (ManagementObject userAccount in resultOfSearch)
{
userAccountObject = userAccount;
break;
}
}
return userAccountObject;
}
/// <summary>
/// Returns the Security Identifier Sid of the given user
/// </summary>
/// <param name="userAccountObject">The user object who's Sid needs to be returned</param>
/// <returns></returns>
private static ManagementObject GetAccountSecurityIdentifier(ManagementBaseObject userAccountObject)
{
ManagementObject securityIdentfierObject = new ManagementObject(string.Format("Win32_SID.SID='{0}'", (string)userAccountObject.Properties["SID"].Value));
securityIdentfierObject.Get();
return securityIdentfierObject;
}
/// <summary>
/// Create a trustee object for the given user
/// </summary>
/// <param name="domain">name of domain</param>
/// <param name="userName">the network name of the user</param>
/// <param name="securityIdentifierOfUser">Object containing User's
sid</param>
/// <returns></returns>
private static ManagementObject CreateTrustee(string domain, string userName, ManagementObject securityIdentifierOfUser)
{
ManagementObject trusteeObject = new ManagementClass("Win32_Trustee").CreateInstance();
trusteeObject.Properties["Domain"].Value = domain;
trusteeObject.Properties["Name"].Value = userName;
trusteeObject.Properties["SID"].Value = securityIdentifierOfUser.Properties["BinaryRepresentation"].Value;
trusteeObject.Properties["SidLength"].Value = securityIdentifierOfUser.Properties["SidLength"].Value;
trusteeObject.Properties["SIDString"].Value = securityIdentifierOfUser.Properties["SID"].Value;
return trusteeObject;
}
/// <summary>
/// Create an Access Control Entry object for the given user
/// </summary>
/// <param name="trustee">The user's trustee object</param>
/// <param name="deny">boolean to say if user permissions should be assigned or denied</param>
/// <returns></returns>
private static ManagementObject CreateAccessControlEntry(ManagementObject trustee, bool deny)
{
ManagementObject aceObject = new ManagementClass("Win32_ACE").CreateInstance();
aceObject.Properties["AccessMask"].Value = 0x1U | 0x2U | 0x4U | 0x8U | 0x10U | 0x20U | 0x40U | 0x80U | 0x100U | 0x10000U | 0x20000U | 0x40000U | 0x80000U | 0x100000U; // all permissions
aceObject.Properties["AceFlags"].Value = 0x0U; // no flags
aceObject.Properties["AceType"].Value = deny ? 1U : 0U; // 0 = allow, 1 = deny
aceObject.Properties["Trustee"].Value = trustee;
return aceObject;
}
The code above is pretty self explanatory, albeit not a good demonstration of catching exceptions and checking for boundary conditions.
As you can see, I am using the ManagementObjectSearcher class to search for shared folder’s setting and user account objects as done in the GetSharedFolderObject() and GetUserAccountObject() methods. Once, we have got the objects, we are working with them to modify and create the related objects necessary to give new permissions.
Wednesday, 18 March 2009
Quantitative Easing
The term "Quantitative Easing" has been mentioned quite often in news these days. I didn't know an aweful lot about it and had some time handy today, so thought to study it a bit. I am just jotting down my findings in as simple words as possible.
Wikipedia defines "Quantitative Easing" as a mechanism for central banks to pump liquidity (money supply) in the economy. In other words, central bank will print more money and put it in circulation, so for example if there was £18bn of wealth in circulation through currency notes it would be increased to £20bn of wealth.
So, how do central banks do it?
Well, the honest answers is that it's the central bank and it's standing in the world that determines the wealth for us. A £10 currency note is actually the property of the Bank of England and the idea is that if I give £10 to BoE, it would return me an equivalent amount of "wealth". Now, "wealth" used to be old solid gold in the old days (well, upto 1932). These days its a combination of T-Bills, government bonds and a host of other financial tools. These tools are bought and kept by commercial banks as deposits for the lending they do.
Through quantitative analysis, central banks buy back these bonds and provide cash against these. Since, banks are required to only keep a percentage of their deposits as reserve (say 50%), increasing liquidity in banks by say £1000 would enable them to lend out £2000. This increase the money supply to banks, who can then lend them to individuals and business.
Negative Effects:
With more money in circulation, there will be more money chasing lesser goods making everything more "expensive". There is a genuine risks of inflation shooting through the roof. It depreciates the "actual" value of assetts for investers and devalues the currency.
Who's doing it?
Bank of England announced it earlier this month. And today, the Federal Reserve in US has announced it. The scale of money pumping in by the US is mind boggling. Of course, both the economies are hit hard by the credit crunch and are undergoing negative inflation.
Winners & Loosers:
The winners would be banks and financial companies. With the value of money reducing, the actual value of their bad debts would go down and they would have more cash to lend. After Quantitative Easing, a bad debt of say £100,000 would have the same effect as a bad debt of £90,000.
The biggest loosers, I think, would be Asian and OPEC countries, who keep their reserves in dollars. All gulf countries, for example, have pegged their currencies against dollars. A devaluation of dollars would devalue their currencies and reduce their wealth. Also, countries like China and India have hoarded huge sums of dollars. They will see the actual value of their dollar based wealth dwindle.
What next?
I am quite keen to see
1) How China respond to this announcement by Federal Reserve today? Will they be selling T-Bills? Would it switch buy more Euro based assetts?
2) Will the European Central Bank adopt Quantitative Easing? This is one of the sternest test of the European Economic Commission. They have countries like Germany & France on one end, which would want it to happen and have countries like Poland, which still have strong inflationary pressure and would not want to do it.
Friday, 13 March 2009
New release of Microsoft StyleCop
A new version of Microsoft StyleCop was released yesterday. If you are not already using StyleCop, do it try it out. For years, I have been frustrated by developers using inconsistent layouts, variables defined all over the place, different styles, etc which effect the readability of the code. This is where stylecop comes handy and once integrated into the build process, it would flag all inconsistencies in the project. This ensures that code is readable and maintainable throughout.
If you are using MSBuild Entension Pack, there is a task defined for running StyleCop. Integrate it into your CI build and the developers would instantly know if a developer have done some misdemeanour :)
If you are using MSBuild Entension Pack, there is a task defined for running StyleCop. Integrate it into your CI build and the developers would instantly know if a developer have done some misdemeanour :)
Friday, 6 March 2009
Say yes to "No"
Josh Billings once famously said
"One-half the troubles of this life can be traced to saying yes too quickly..."
and reflecting back, this is certainly something true to my life. I have often found myself worried about doing things, which I could have avoided. I think, my habbit is rooted from my cultural background.
The fact it that people from Indian subcontinent are not used to hearing apologies. So, if someone invites you for dinner, for instance, and you can't make it, it can become really difficult to excuse out of it. People would insist and insist until you agree to what they are asking. The result is that people end up making commitments that they can't meet and people saying things they don't really mean. I, for one, find it frustrating.
Tuesday, 3 March 2009
ASP.net MVC Framwork Part 3
In my previous post, I wrote about the Microsoft ASP.Net MVC Framework and demonstrated with the help of a simple application, how it simplifies the use Model-View-Controller design pattern in web applications. The ultimate motive for using the patter is of course to achieve seperation of business and presentation logic.
In this post, I will write about what actually happens under the hood in the MVC framework and how does it enables us to create more simpler applications. The underlying technology used in the MVC framework is not new. If you are familiar with the Micorosoft Internet Information server (IIS), you would have surely heard about ISAPI Extensions and ISAPI Filters.
ISAPI Extensions are program that run on the IIS web server and have access to the functionality provided by IIS. They are the ultimate target of all web requests and are responsible for processing them. ISAP Filters are programs through which all client requests are filtered through before they are finally processed by ISAPI extensions.
To harness the functionality of ISAPI Exentions and ISAPI filter, ASP.Net provides Http Handlers and Http Modules respectively. A following pictures gives a graphical representation of a web request through HTTP Modules and HTTP Handlers.

The HTTP Handler class must implement the IHTTPHandler interface in the System.Web namespace. For every type of web request, an HTTP handler must exist to preocess it. In a web application, the Http Handlers to process different kinds of files are listed in the web.config file. The following code snippet shows an example of all HTTP
As you might have guessed so far, the functionality of MVC framework is provided through HTTP Module and HTTP Handlers, which provides all the functionailty of routing and passing data between controller and view.
To process the custom URL, the framework make use of UrlRoutingModule. In the above extract from web.config, you will find the the entry
<add name="urlRouting" type="System.Web.Routing.UrlRoutingModule, System.Web.Routing"/>
A RouteTable needs to be defined to handle the URL pattern. This is done in the Application_OnStart event in the global.asax file. This is shown below:
Inside the method RegisterRoute, there is a call routes.MapRoute, which takes three parameter. The first parameter is the name of the route, the second parameter contains the pattern of URL and the three parameter contains default values for URL.
As you can see, the pattern used in URL is "{Controller}/{Action}/{Id}". When the URL is called, the class in the controller section is called as controller, the action value is set through the action part of URL and if there is a record selected then the Id is passed through the Id section.
The HTTP module System.Web.Routing.UrlRoutingModule makes sure that requests are passed to controller and that all data submitted from the view is passed to it.
In this post, I will write about what actually happens under the hood in the MVC framework and how does it enables us to create more simpler applications. The underlying technology used in the MVC framework is not new. If you are familiar with the Micorosoft Internet Information server (IIS), you would have surely heard about ISAPI Extensions and ISAPI Filters.
ISAPI Extensions are program that run on the IIS web server and have access to the functionality provided by IIS. They are the ultimate target of all web requests and are responsible for processing them. ISAP Filters are programs through which all client requests are filtered through before they are finally processed by ISAPI extensions.
To harness the functionality of ISAPI Exentions and ISAPI filter, ASP.Net provides Http Handlers and Http Modules respectively. A following pictures gives a graphical representation of a web request through HTTP Modules and HTTP Handlers.

The HTTP Handler class must implement the IHTTPHandler interface in the System.Web namespace. For every type of web request, an HTTP handler must exist to preocess it. In a web application, the Http Handlers to process different kinds of files are listed in the web.config file. The following code snippet shows an example of all HTTP
<system.webServer>
<modules runAllManagedModulesForAllRequests="true">
<remove name="ScriptModule"/>
<remove name="UrlRoutingModule"/>
<add name="ScriptModule" preCondition="managedHandler" type="System.Web.Handlers.ScriptModule, System.Web.Extensions, Version=3.5.0.0, Culture=neutral, PublicKeyToken=31BF3856AD364E35"/>
<add name="UrlRoutingModule" type="System.Web.Routing.UrlRoutingModule, System.Web.Routing, Version=3.5.0.0, Culture=neutral, PublicKeyToken=31BF3856AD364E35"/>
</modules>
<handlers>
<remove name="ScriptHandlerFactory"/>
<remove name="ScriptHandlerFactoryAppServices"/>
<remove name="ScriptResource"/>
<remove name="MvcHttpHandler"/>
<remove name="UrlRoutingHandler"/>
<add name="ScriptHandlerFactory" verb="*" path="*.asmx" preCondition="integratedMode" type="System.Web.Script.Services.ScriptHandlerFactory, System.Web.Extensions, Version=3.5.0.0, Culture=neutral, PublicKeyToken=31BF3856AD364E35"/>
<add name="ScriptHandlerFactoryAppServices" verb="*" path="*_AppService.axd" preCondition="integratedMode" type="System.Web.Script.Services.ScriptHandlerFactory, System.Web.Extensions, Version=3.5.0.0, Culture=neutral, PublicKeyToken=31BF3856AD364E35"/>
<add name="ScriptResource" preCondition="integratedMode" verb="GET,HEAD" path="ScriptResource.axd" type="System.Web.Handlers.ScriptResourceHandler, System.Web.Extensions, Version=3.5.0.0, Culture=neutral, PublicKeyToken=31BF3856AD364E35"/>
<add name="MvcHttpHandler" preCondition="integratedMode" verb="*" path="*.mvc" type="System.Web.Mvc.MvcHttpHandler, System.Web.Mvc, Version=1.0.0.0, Culture=neutral, PublicKeyToken=31BF3856AD364E35"/>
<add name="UrlRoutingHandler" preCondition="integratedMode" verb="*" path="UrlRouting.axd" type="System.Web.HttpForbiddenHandler, System.Web, Version=2.0.0.0, Culture=neutral, PublicKeyToken=b03f5f7f11d50a3a"/>
</handlers>
</system.webServer>
As you might have guessed so far, the functionality of MVC framework is provided through HTTP Module and HTTP Handlers, which provides all the functionailty of routing and passing data between controller and view.
To process the custom URL, the framework make use of UrlRoutingModule. In the above extract from web.config, you will find the the entry
<add name="urlRouting" type="System.Web.Routing.UrlRoutingModule, System.Web.Routing"/>
A RouteTable needs to be defined to handle the URL pattern. This is done in the Application_OnStart event in the global.asax file. This is shown below:
public static void RegisterRoutes(RouteCollection routes)
{
routes.IgnoreRoute("{resource}.axd/{*pathInfo}");
routes.MapRoute(
"Default", // Route name
"{controller}/{action}/{id}", // URL with parameters
new { controller = "Home", action = "Index", id = "" } // Parameter defaults
);
}
protected void Application_Start()
{
RegisterRoutes(RouteTable.Routes);
}
Inside the method RegisterRoute, there is a call routes.MapRoute, which takes three parameter. The first parameter is the name of the route, the second parameter contains the pattern of URL and the three parameter contains default values for URL.
As you can see, the pattern used in URL is "{Controller}/{Action}/{Id}". When the URL is called, the class in the controller section is called as controller, the action value is set through the action part of URL and if there is a record selected then the Id is passed through the Id section.
The HTTP module System.Web.Routing.UrlRoutingModule makes sure that requests are passed to controller and that all data submitted from the view is passed to it.
Subscribe to:
Posts (Atom)